

We just launched our new Restoration Timber Collection, which include reclaimed wood shelves with soul! They are charming, rustic pieces of reclaimed wood with simple L-shaped metal brackets that are easier to install than you might think! Just in case you’re unsure of how to do it, though, we wanted to provide you with a simple guide for how to install wood shelves.
Supply List:
- 1 or more reclaimed wood shelves
- Gloves for handling the shelves. They are rustic!
- Hardware
- Anchors that can handle the weight of what you might put on the shelves
- Screws that are less than 2-inches long
- Stud Finder
- Yardstick or a piece of Stikwood
- Tape measure
- Level
- Drill
- Pencil
- Black Sharpie
Decide where to hang the shelves:

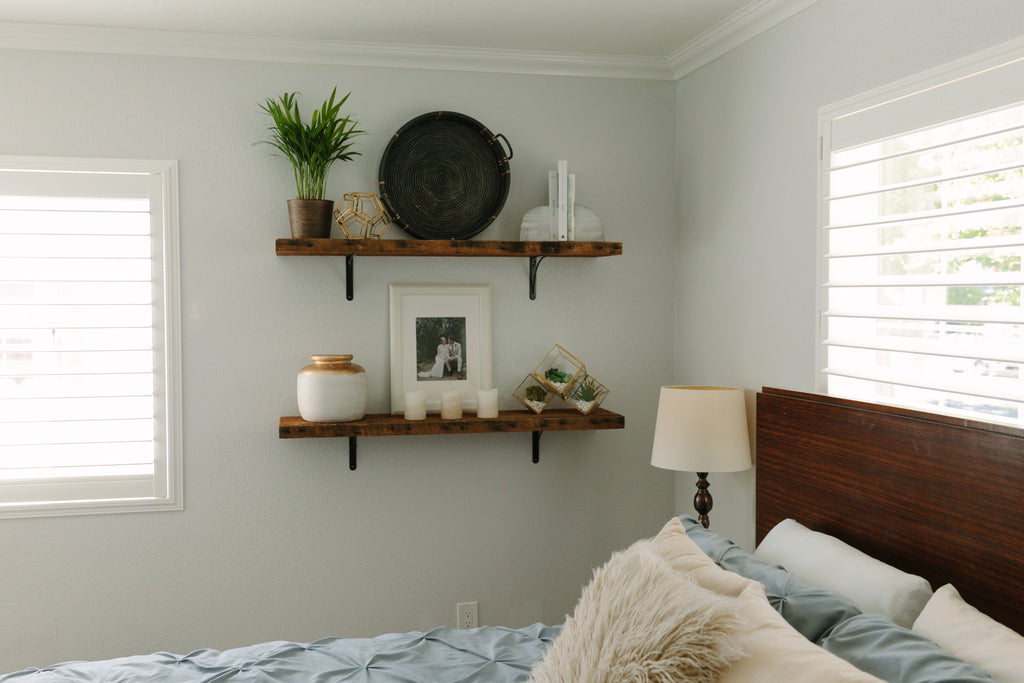
The first step is to decide where to hang your shelves. These beautiful DIY shelves come in three different lengths (four-feet, six-feet and eight-feet), which provide ample options for placement. They look stunning in a contemporary bedroom, an industrial guest bathroom, or even a modern farmhouse kitchen.
How to Install Wood Shelves Tip 1: It can be tempting to hang your shelves high on the wall, especially if you are a tall person, but avoid that temptation! We’ve put together some handy guidelines for the best heights to place your DIY shelves at:
- In order to keep things at eye-level, hang the shelves between 57-60 inches above the floor.
- If you’re hanging the shelf above a headboard or a couch, 8-10 inches above the furniture is typical. However, test this to make sure you won’t hit your head.
- If you’ll be using these in a kitchen, be sure to hang the bottom shelf only 54 inches from the floor. The rest should be placed 12-16 inches above the others.
Once you’ve decided where to place the shelves, it’s time to install the brackets!
How to Install Wood Shelves Tip 2: The brackets should be placed every two feet along the shelf in order to make sure it can handle the weight of your décor.
To install the brackets for the wall mounted shelves:
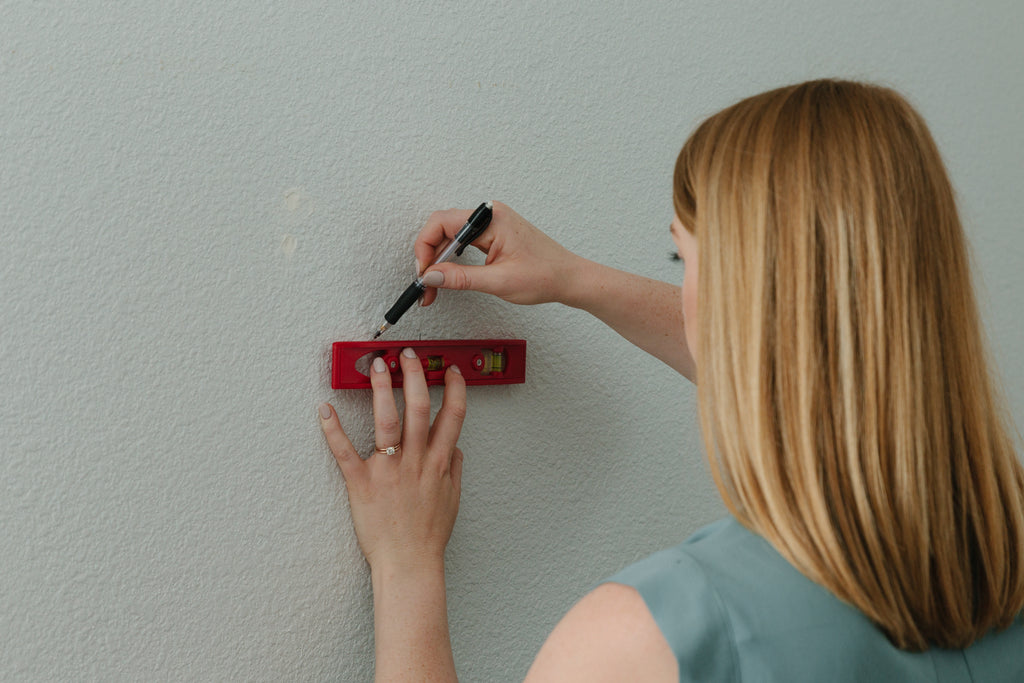
- Draw a very light pencil line where the shelves will go. Be sure to use a level when measuring the line to make sure the shelves end up straight.
- Starting in the center of the line, measure two feet to the right, and place a mark on the line. Now, go back to the center, measure two feet to the left and mark the line again. These will be the places where you install your brackets. Finish marking the line for the number of brackets you will need.
- Next, using a stud finder, check to see if there’s a stud in any of the locations where you will be placing brackets. If there’s a stud, then you won’t need wall anchors. If, on the other hand, studs don’t exist where your brackets will be placed, then choose wall anchors that can handle the weight of whatever you will be placing on top of the shelves plus the weight of the shelves themselves.
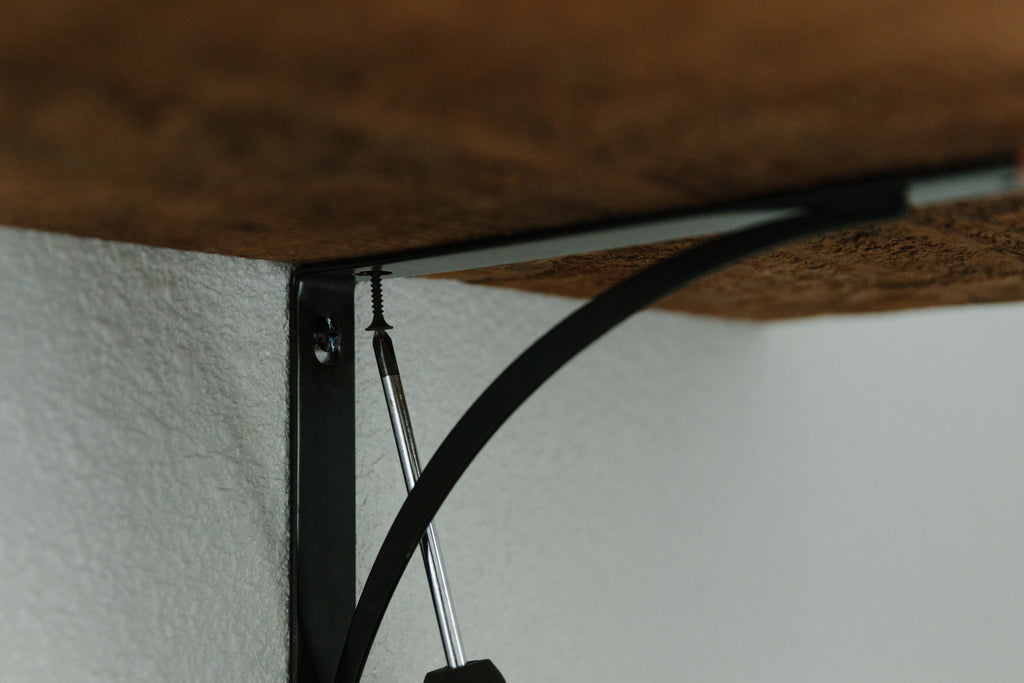
- Place the top of the bracket on the marked line, and mark where the holes will need to be drilled.
- Now comes the fun part! Attach the correct size drill bit to your power drill and create some pilot holes for the anchors. The anchor’s packaging should tell you everything you need to know for installation
- Once the anchors have been installed, screw the brackets into place. Carefully place your wood shelves on top of the brackets and make sure everything is level. Adjust things if needed, then secure the shelf onto the brackets by installing screws into the bottom of the shelf.
How to Install Wood Shelves Tip 3: If you're screws are silver, use a black Sharpie to color them in, so that they are not noticeable against the black metal of the brackets.

Now that you know how to install wood shelves, let’s talk décor!

It’s easy to over clutter a shelf, but with a few helpful design guidelines, you’ll be able to decorate your shelves in a way that would make Nate Berkus proud!
- The golden rule of threes: things arranged in odd numbers are typically more visually appealing and memorable than things that are grouped in pairs. So, when choosing items that you like, try to make sure you use 3, 5, or 7 items. This is especially helpful when working with small keepsakes.
- Pay attention to scale: make sure your décor is well balanced by picking items with varying heights and sizes. It will add visual interest to a space. Start by placing the tallest objects onto the shelves first, then the ones that take up the most amount of space, and then finish them off with the little things that make you smile.
- Create symmetry: Symmetry is also really important for balance. In this design, we started by placing the basket in the center, because it was the tallest item we had and it also took up the most amount of space. Once it was placed, we knew that in order to anchor it, we needed to choose things with some height. So, we decided on a tall middle book and a tall plant. Likewise, the shorter bookends needed something to anchor them, so we decided to make sure the plant’s pot was around the same height on the other side of the shelf.
No matter where you’ve mounted these heavy-duty reclaimed wood shelves, they are sure to add warmth, character and a sense of beauty to your room for many years to come!
